|
|
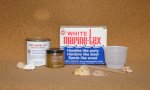
Suffice it to say, after reading the instructions I became a little worried about how I would mix the Marine-Tex. Since Marine-Tex is an epoxy, measuring the correct ratio of catalyst to resin is crucial. Had I stayed with the small kit I could have simply mixed everything together. Now, however, was a different story. There was no way I could mix all the contents with each other, knead them together, and work them into the holes in the time allotted. As it was, the disposable material which come with the kit are, well, disposable. One use and that'd be it. (BTW, even though pictured in the photos, the shells are not included.) |
Digging through my collection of, erm, "junk", I managed to uncover a mixing board I had one entertained using for Bondo (never happened) and, since I couldn't find my other one, decided to suck it up and buy a new putty knife. Those items languished for a week while I decided what to do about measuring everything. Finally the problem fixed itself when my wife bought me a set of measuring spoons which were on clearance at her workplace. Now I had something to work with!
| Unsure of how much epoxy I would need, I went ahead and set the Hurricane on its side to expose the most holes and repair what I could with whatever I mixed. I decided upon 2.5 table spoons (the ratio is 5:1) and quickly set about measuring. The resin is the consistency of putty and the one I measured first. Cleaning the measuring spoon off was a bit of work but eventually I was able to spoon in my one part of hardener. Leaving the cleaning duties to my dad, I mixed everything together and applied it to the holes. | 
|
As you can see, that little amount covered about one-third the holes on the bottom of the hull. I had to build up some of the larger holes but overall I was rather impressed. I was hoping to sand what I'd done but the night was progressing and, really, the Marine-Tex needed to setup for a while. Rather than half-ass the job, I fought my impulse to grab the sanding block and go at it. Whether this was for good or ill, I'm still not sure.

|
Over the next couple of weeks I forwent (yes, that is a word) the sanding in favour of patching the other various holes and chips in the hull. Again, I prepped the holes with my "rotary tool" and ground out all the bad fiberglass. This 1) made a mess and 2) disheartened me as the little chips, cracks, et cetera were made much larger to give the Marine-Tex good material to adhere to. Any of the (nearly-)vertical surfaces needed reinforced on the bottom to keep the epoxy from flowing through or dripping down. The only hole which really bugged me was the one for the starter wire. There had been a piece of metal covering the 6" elongated hole caused by negligence. What a bummer. |
 Back |
 Next |